
Why is the Sky Blue - Easy Science Projects
These 3 fun and easy science projects will help you understand why the sky is blue and sunsets are red.
SAFETY NOTE: Please read all instructions completely before starting. Observe all safety precautions.
Table of Contents
Project 1 - Split light into a spectrum
What you need:
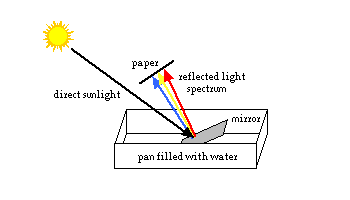
- a small mirror, a piece of white paper or cardboard, water
- a large shallow bowl, pan, or plastic shoebox
- a window with direct sunlight coming in, or a sunny day outdoors
What to do:
- Fill the bowl or pan about 2/3 full of water. Place it on a table or the floor, directly in the sunlight. (Note: the direct sunlight is important for this experiment to work right.)
- Hold the mirror under water, facing towards the sun. Hold the paper above and in front of the mirror. Adjust the positions of the paper and mirror until the reflected light shines on the paper. Observe the colored spectrum.
What happened:
The water and mirror acted like a prism, splitting the light into the colors of the spectrum. (When light passes from one medium to another, for example from air to water, its speed and direction change. [This is called refraction, and will be discussed in a future issue.] The different colors of light are affected differently. Violet light slows the most, and bends the most. Red light slows and bends the least. The different colors of light are spread out and separated, and we can see the spectrum.)
Project 2 - Sky in a jar
What you need:
- a clear, straight-sided drinking glass, or clear plastic or glass jar
- water, milk, measuring spoons, flashlight
- a darkened room
What to do:
- Fill the glass or jar about 2/3 full of water (about 8 - 12 oz. or 250 - 400 ml).
- Add 1/2 to 1 teaspoon (2 - 5 ml) milk and stir.
- Take the glass and flashlight into a darkened room.
- Hold the flashlight above the surface of the water and observe the water in the glass from the side. It should have a slight bluish tint. Now, hold the flashlight to the side of the glass and look through the water directly at the light. The water should have a slightly reddish tint. Put the flashlight under the glass and look down into the water from the top. It should have a deeper reddish tint.
What happened:
The small particles of milk suspended in the water scattered the light from the flashlight, like the dust particles and molecules in the air scatter sunlight. When the light shines in the top of the glass, the water looks blue because you see blue light scattered to the side. When you look through the water directly at the light, it appears red (like a sunset or sunrise) because some of the blue was removed by scattering.
Project 3 -Mixing colors
You need:
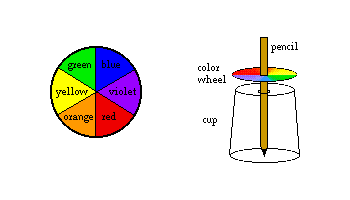
- a pencil, scissors, white cardboard or heavy white paper
- crayons or markers, a ruler
- a small bowl or a large cup (3 - 4 inch, or 7 - 10 cm diameter rim)
- a paper cup
What to do:
- Use the bowl to trace a circle onto a piece of white cardboard and cut it out. With the ruler, divide it into six approximately equal sections.
- Color the six sections with the colors of the spectrum as shown. Try to color as smoothly and evenly as possible.
- Poke a hole through the middle of the circle and push the pencil part of the way through.
- Poke a hole in the bottom of the paper cup, a little bit larger than the diameter of the pencil. Turn the cup upside down on a piece of paper, and put the pencil through so the point rests on the paper on a table. Adjust the color wheel's position on the pencil so that it is about 1/2 inch (1 - 2 cm) above the cup.
- Spin the pencil quickly and observe the color wheel. Adjust as necessary so that the pencil and wheel spin easily.
What happened:
The colors on the wheel are the main colors in white light. When the wheel spins fast enough, the colors all appear to blend together, and the wheel looks white. Try experimenting with different color combinations.
Learn more about colors using chromatography